All Categories
Featured
Table of Contents
- – Trailer Restoration Placentia, CA
- – OCRV Center
- – Travel Trailer Ceiling Repair Placentia, CA
- – Rv Trailer Repair Near Me Placentia, CA
- – Travel Trailer Repairs Placentia, CA
- – Travel Trailer Floor Repair Placentia, CA
- – Horse Trailer Repairs Placentia, CA
- – Rv Trailer Repair Shops Near Me Placentia, CA
- – Rv Trailer Repair Near Me Placentia, CA
- – Rv Trailer Repair Shop Placentia, CA
- – 5th Wheel Repair Near Me Placentia, CA
- – Travel Trailer Service Placentia, CA
- – Travel Trailer Awning Replacement Placentia, CA
- – Rv Travel Trailer Repair Near Me Placentia, CA
- – OCRV Center
Trailer Restoration Placentia, CA
Here are previously and after shots. I got the trailer home and pushed it in my garage. Time to get to work! Most of the wood was linked to the trailer with old corroded screws. I used an outlet wrench and crescent wrench for this action. You can see in the photo listed below that the old plywood needed to be replaced.
I ended up making use of a pry bar to remove the wood. All of the plywood was efficiently removed. Move and scrape all the dust and gunk out of the trailer frame.
Travel Trailer Ceiling Repair Placentia, CA
I made use of 120 grit sandpaper. If there are locations you wish to be a lot more aggressive with I 'd suggest using a flap disk on an angle mill. It will smooth out welds and get rid of paint rapidly. Once the frame has been sanded, eliminate lights if required and tape off areas you don't desire repainted.

For details regarding re-wiring please take a look at my 510 trailer bring back job. Replacement lights and electrical wiring sets can be located on Amazon. The trailer is currently prepped for painting. Use enamel spray paint to make your trailer resemble new. I made use of gloss black spray paint made by Rustoleum. I normally repaint all metal surfaces, even underneath.
Rv Trailer Repair Near Me Placentia, CA
Given that it is a just a trailer, I simply spray painted the edges with white. To safeguard the wheels from overspray you can tape them off.
Do not fret if you overspray the tires. Just use a scotch pad to eliminate the undesirable paint from the tire. Pin it This is what the trailer looked like after finishing all of the painting. I connected new support cots for the 48 sheet of plywood. I affixed the side boards using 2 1/4 inch bolts.
Travel Trailer Repairs Placentia, CA
Classic Trailer Talk is a place to see, discuss, and article subjects associated to all points classic trailer.
I'm a lil shocked out of all of those who selected one up, none have returned with point of views - Placentia Travel Trailer Replacement Windows. I just checked out the "complimentary duplicate". I think somebody made a respectable initiative to share what they had learned with I assume it is a bad impact on those new trailer owners who wish to "do it best" and in fact restore a trailer
The structures on these trailers weren't that strong. I disagree with having individuals think they can make mold and rot "go away" by covering and or hiding it.
What of the beginner hooked on the vintage trailer possession concept that buys among these plagued trailers assuming it is "recovered"? Just how numerous individuals are cheated every year right into purchasing one by a seller that recognizes full well the problem, however misleads to make an (unfair) earnings. So far, nobody has been harmed that I've heard by one of these "covered together" trailers disintegrating while running down the highway, but someday it will certainly occur, ideally not while in front of somebody you appreciate.
Travel Trailer Floor Repair Placentia, CA
To those who simply desire to fix an old trailer and not "restore it", no problem, it can be an excellent way to enjoy a trailer on a spending plan, however be certain you do it securely - Placentia Travel Trailer Replacement Windows. The old saying that goes something like; Approving without doubt advice provided by someone attempting to market you something is typically a risky roadway to take a trip
I had the chance to picture a vintage trailer at the beginning of its restoration procedure. Can anyone tell me what it is from these photos? How do you connect photos to this?
Horse Trailer Repairs Placentia, CA
Howdy. Now prepare to hold onto something, this insane endeavor can be a thrilling adventure! I don't have a great deal of time to publish right now, to answer your concerns done in depth, however allowed's just say, "begin below: "You will certainly locate many video clips of all different stages of trailer restoration there, right down to the nuts and bolts of the construction of these old jobs.
"Outside-in" is the proper approach for restoring, as they are put with each other in layers, instead than hung from a framework. Traveling trailers are not built like residences are. Real rapid one more thing . Openings with the wall surfaces and roofing system must be sealed around components making use of putty tape. Seams can likewise be dealt with without the taping process, although there have been some real excellent outcomes seen with the Eternabond things - Placentia Travel Trailer Replacement Windows.
Rv Trailer Repair Shops Near Me Placentia, CA
Remember we are below to help, and anything that seems like criticism is just that, vital analysis, and absolutely nothing individual. So above all, have fun!.
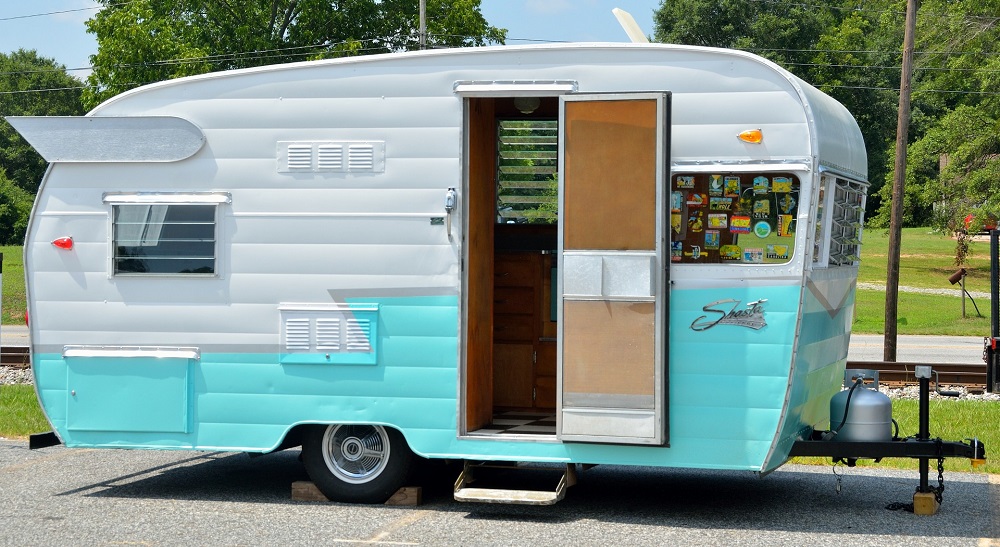
If you have actually ever seen The Long, Long, Trailer with Lucille Sphere and Desi Arnez, you understand the appeal of the vintage trailer. There's something about seeing a completely recovered item of the past that reverberates with people around the world. Of program, there's a huge distinction in between admiring a restored vintage trailer, and doing the actual improvement.
Rv Trailer Repair Near Me Placentia, CA
Instantly that desire trailer has come to be a money sucking equipment. To bring back a vintage trailer you have to have passion or else your chance of sticking it out through the hard work is slim.
Flyte Camp, situated in Bend, Oregon concentrates on recovering travel trailers from the 1930s with the '50s. Up until now, he's doing a wonderful task and loving every minute of it. Justin Scribner comprehends the frustration of the typical retro trailer acquisition. "We have a lot of trailer proprietors that buy something out in the field or online," he informed the Orgeonian in a June 2012 interview.
Flyte Camp is in high need as one of the only business in the United States that properly recovers vintage Recreational vehicles. Individuals all over the world deliver their classic treasures to Flyte Camp for an improvement.
If that's inadequate, it shows up that Flyte Camp will certainly quickly be the topic of their own fact television program. Audiences will comply with Justin and he looks for the best restoration tasks. Among things that makes Flyte Camp stick out from the pack is their level of study.
Rv Trailer Repair Shop Placentia, CA
They aim to recognize the original trailer before restoring it to its former glory. Unlike the RVs of today, the majority of traditional trailers include beautiful wood interiors.
In the office they address 50-100 phone calls and e-mails each day. What does a brought back trailer expense? Below's one instance. The Scribners bought vintage trailer for a plain $2,400 a deal right? Over the training course of several months, the group spent $23,000 on products and place in numerous hours in labor.
5th Wheel Repair Near Me Placentia, CA
When you include up all the time and power, you require to enjoy the work or it's rarely worth it. Over time he established an enthusiasm for mid century trailers and bought one to offer recovering a try.
The trailer ended up being a normal component in the Scribner's driveway. Justin worked on it when he had time.
In time, he conquered his very first remediation, and his partner Anna joined him in his new found enthusiasm. The pair started to camp with their trailer taking short weekends away. They played old time records and found out to turn dance. There was something magical regarding going back in time. By the time they sold the Shasta they were all in.
Travel Trailer Service Placentia, CA
One drew from an old area and an additional purchased online. The interest had taken hold. Ironically, as the economic downturn shut the flooring company, the retro service will take flyte! Today, Flyte Camp has six workers and a 7,000 square foot store. They function on numerous devices at once and deal with every little thing from interior decoration to plumbing.
While Airstream get's a great deal of press, Flyte Camp is all about the early period trailers from 1935-1945. This was the height of the commercial design in the United States and lots of think these trailers are absolutely a job of art. In spite of the economic clinical depression that swept the nation around this time around period, several families kept sufficient cash money to acquire high-ends in life.
Travel Trailer Awning Replacement Placentia, CA
These trailers were typically made in the shape of a bread loaf and supplied a tin roofing system with masonite exterior siding. High style was king and the interior decorations were built with stylish interiors like you might locate on a first-rate train. A number of the trailers included dark walnut or cherry timber with hand sculpted moldings and artistic floor tile job.
In the 1940s the outbreak of The second world war quit traveling trailer manufacturing. The battle effort was the leading concern. When the battle mored than, traveling trailers were hotter than ever before. Made with a steel fuselage, numerous of the units were riveted much like an aircraft. The kitchen area closets and countertops were likewise produced with airplane stainless-steel and while these devices were a lot more mass generated, they still used high quality materials.
Back then, workmanship counted. Every item of the trailer was done by hand without a pressing routine. They took the time to make points right. They tried new things. They tested their limits. Roadway travel was still in its infancy and making individuals satisfied was these building contractor's primary worries.
They desired the high quality to establish them over their competition. At Flyte Camp they make every item of the restoration by hand. Each information is important and the only point they contract out is the upholstery and exterior paint. A repair typically involves removing the trailer shell, removing out the electrical and establishing the condition of the frame and indoor panels.
Rv Travel Trailer Repair Near Me Placentia, CA
When Flyte Camp agrees to a project they do their best to bring the trailer back to its original magnificence. There's something wonderful about conserving bringing an old trailer back to life.
You can restore it on your own. The Sande family members in Redmond, Oregon made a decision to do simply that. They purchased a 1950's Traveleze for $1,500. They could not believe their good luck. After that they started the job. They discovered rot almost everywhere. From framework to the roofing system, the trailer needed significant aid. Within a couple of weeks they know that they were out of their organization.
OCRV Center
Address: 23281 La Palma Ave Yorba Linda, CA 92887Phone: (714) 909-1444
Email: art@ocrvcenter.com
OCRV Center
Eric Sande discovered by hand that bring back a vintage trailer is not a weekend job. Eric called Flyte Camp to request assistance. $25,000 later on the "canned ham" style trailer was done. "I initially thought, 'Gee, if I spend $8,000 to $10,000 maybe it will certainly be worth something,'" recalls Sande.
Rv Trailer Repair Near Me Placentia, CATrailer Floor Repair Placentia, CA
Rv Travel Trailer Repair Near Me Placentia, CA
Fifth Wheel Service Placentia, CA
Travel Trailer Floor Repair Placentia, CA
Rv Trailer Repair Near Me Placentia, CA
Travel Trailer Repairs Placentia, CA
Travel Trailer Floor Repair Placentia, CA
Travel Trailer Window Replacement Placentia, CA
Travel Trailer Awning Replacement Placentia, CA
Trailer Roof Repair Placentia, CA
Trailer Restoration Placentia, CA
Camper Trailer Service Placentia, CA
Travel Trailer Service Placentia, CA
Cargo Trailer Repair Placentia, CA
Trailer Windows Replacement Placentia, CA
Horse Trailer Repair Near Me Placentia, CA
Rv Trailer Repair Near Me Placentia, CA
Fifth Wheel Repair Near Me Placentia, CA
Trailer Floor Repair Placentia, CA
Camper Floor Repair Near Me Placentia, CA
Trailer Floor Repair Placentia, CA
Travel Trailer Replacement Windows Placentia, CA
Trailer Windows Replacement Placentia, CA
Trailer Awning Replacement Placentia, CA
Rv Trailer Service Near Me Placentia, CA
Fifth Wheel Service Placentia, CA
Rv Trailer Service Near Me Placentia, CA
Trailer Windows Replacement Placentia, CA
Fifth Wheel Repair Near Me Placentia, CA
Rv Travel Trailer Repair Near Me Placentia, CA
Trailer Windows Replacement Placentia, CA
Trailer Window Replacement Placentia, CA
5th Wheel Repair Near Me Placentia, CA
5th Wheel Repair Near Me Placentia, CA
Fifth Wheel Repair Near Me Placentia, CA
Cargo Trailer Repair Placentia, CA
Fifth Wheel Repair Near Me Placentia, CA
Travel Trailer Ceiling Repair Placentia, CA
Travel Trailer Floor Repair Placentia, CA
Trailer Floor Repair Placentia, CA
Travel Trailer Siding Repair Placentia, CA
Trailer Window Replacement Placentia, CA
Rv Trailer Repair Shop Placentia, CA
Rv Trailer Service Near Me Placentia, CA
Trailer Floor Repair Placentia, CA
Camper Trailer Service Placentia, CA
Travel Trailer Replacement Windows Placentia, CA
5th Wheel Repair Near Me Placentia, CA
Fifth Wheel Service Placentia, CA
Travel Trailer Awning Replacement Placentia, CA
Camping Trailer Repair Near Me Placentia, CA
Travel Trailer Repairs Placentia, CA
Trailer Restoration Placentia, CA
Rv Trailer Repair Shops Near Me Placentia, CA
Travel Trailer Window Replacement Placentia, CA
Travel Trailer Repairs Placentia, CA
Travel Trailer Repairs Placentia, CA
Horse Trailer Repair Near Me Placentia, CA
Travel Trailer Siding Repair Placentia, CA
Trailer Awning Replacement Placentia, CA
Camper Floor Repair Near Me Placentia, CA
Camping Trailer Repair Near Me Placentia, CA
Trailer Windows Replacement Placentia, CA
Cargo Trailer Repair Placentia, CA
Trailer Roof Repair Placentia, CA
Trailer Floor Repair Placentia, CA
Rv Trailer Repair Shop Placentia, CA
Travel Trailer Roof Replacement Placentia, CA
Travel Trailer Repairs Placentia, CA
Horse Trailer Repairs Placentia, CA
Horse Trailer Repair Near Me Placentia, CA
Trailer Roof Repair Placentia, CA
Travel Trailer Window Replacement Placentia, CA
Cargo Trailer Repair Placentia, CA
Trailer Windows Replacement Placentia, CA
Trailer Awning Replacement Placentia, CA
Camper Floor Repair Near Me Placentia, CA
Close To Me Seo Near Me Placentia, CA
Local Seo Agency Placentia, CA
OCRV Center
Table of Contents
- – Trailer Restoration Placentia, CA
- – OCRV Center
- – Travel Trailer Ceiling Repair Placentia, CA
- – Rv Trailer Repair Near Me Placentia, CA
- – Travel Trailer Repairs Placentia, CA
- – Travel Trailer Floor Repair Placentia, CA
- – Horse Trailer Repairs Placentia, CA
- – Rv Trailer Repair Shops Near Me Placentia, CA
- – Rv Trailer Repair Near Me Placentia, CA
- – Rv Trailer Repair Shop Placentia, CA
- – 5th Wheel Repair Near Me Placentia, CA
- – Travel Trailer Service Placentia, CA
- – Travel Trailer Awning Replacement Placentia, CA
- – Rv Travel Trailer Repair Near Me Placentia, CA
- – OCRV Center
Latest Posts
Indian Wells Best Senior Care
Assisted Living Senior Anza
Care Seniors Mecca
More
Latest Posts
Indian Wells Best Senior Care
Assisted Living Senior Anza
Care Seniors Mecca