All Categories
Featured
Table of Contents
- – Motorhome Refrigerator Repair Placentia, CA
- – OCRV Center
- – Rv Service Repair Near Me Placentia, CA
- – Rv Repairs Near Me Placentia, CA
- – Rv Service Repair Near Me Placentia, CA
- – Best Rv Repair Near Me Placentia, CA
- – Best Rv Repair Near Me Placentia, CA
- – Rv Plumbing Repair Near Me Placentia, CA
- – Motorhome Repair Shop Placentia, CA
- – Camper Ac Repair Near Me Placentia, CA
- – Rv Service And Repair Near Me Placentia, CA
- – Motorhome Generator Repair Near Me Placentia...
- – Rv Plumbing Repair Near Me Placentia, CA
- – OCRV Center
Motorhome Refrigerator Repair Placentia, CA
A 1000W inverter would be sufficient for many recreational vehicle needs.: Pure sine wave inverters are best for sensitive electronic devices, while modified sine wave inverters are cheaper and enough for basic needs.: Protects the solar panels to your RV roof.: You can make use of an installing set or select private placing brackets, relying on the panel dimension and your RV's roofing system.
: MC4 connectors for the solar panel circuitry and battery terminals for linking the batteries to the system. The best location is normally a flat, unshaded area on the roof covering of your RV.
: For an extra safe installing, you can use roof covering brackets designed for solar panels. Guarantee the installing hardware is suitable with your panel kind and the roof covering material of your RV (Placentia Motorhome Repair Shops). If you are utilizing brackets, pierce tiny holes for the placing screws, seeing to it to secure them effectively to avoid leaks
Make certain the electrical wiring is secured from the components and protected to the roof covering to protect against damages from wind or road resonances. Locate a cool, completely dry, and quickly accessible place for the cost controller, commonly near the battery bank. This will decrease cable television size and possible power loss. Link the charge controller to both the photovoltaic panels (input) and the batteries (result).
Rv Service Repair Near Me Placentia, CA
A lot of recreational vehicle planetary systems use 12V systems, so you'll likely wire the batteries in parallel.: Link the positive terminals of the batteries with each other and the negative terminals with each other. Then attach the financial institution to the cost controller. Select an area for the inverter where it will certainly be well-ventilated and secured from the aspects.
After that, cable the inverter's air conditioning output to your motor home's electric panel, which powers your air conditioner gadgets (fridge, lights, and so on). As soon as everything is connected, it's time to check your motor home solar system.: Make sure it's billing the batteries correctly and the system is working as expected.: Use a multimeter to inspect battery voltage and guarantee it's within the suggested variety.
Rv Repairs Near Me Placentia, CA
Beginning with little gadgets and slowly enhance to larger ones like the refrigerator or air conditioner.: on a regular basis to ensure they are without dirt, dirt, and debris.: Consistently check battery voltage and cost degrees to avoid over-discharging.: Check all circuitry and links occasionally for wear, rust, or loosened connections.
This course is designed for the RV Service Technician, Recreational Vehicle Examiner, or recreational vehicle proprietor that has an interest in solar power devices for the recreational vehicle. Pupils advance assessment, analysis, and troubleshooting skills of solar energy as it connects to RV operations. Trainees will learn how to select, set up, run, and preserve solar power in addition to how to isolate and repair solar equipment troubles.
Rv Service Repair Near Me Placentia, CA
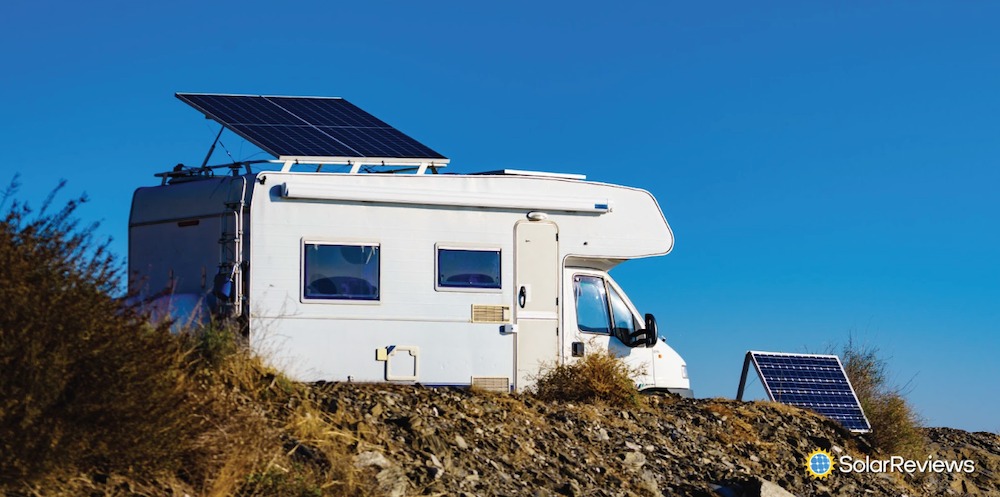
Photovoltaic Panel Install- Turmoil, Kiddos & Consistency In the last couple of years, RVing has come to be increasingly much more prominent. The choices of where to stay have actually come to be vast open for RVers. Not only do you have options to remain at motor home Parks and Motor Home Resorts, being off the grid or boondocking has actually ended up being an extra traditional option and much less frightening.
A fantastic service is solar energy systems, unlike gas powered generators, solar power a solar power system is simply that, a system. It is much more than simply the 2 main parts of batteries and panels. There are 5 standard components to a solar power system which is laid out below.
Best Rv Repair Near Me Placentia, CA
Opportunities are you will need an inverter. The transfer button is an expensive name to change in between inverter power (solar power) and direct connect (called it's naval name of "coast power"). This switch makes sure that power is coming from one resource and not both at any type of given time. Fortunately is, the majority of the time the inverter also consists of a transfer button, so additional elements may not be required.
Just like the batteries in your TV remote or child's playthings, they save power and supply it when you need it. The distinction here is, depending on what you need power for, you need a whole lot more power than the television remote. There are 3 major kinds of batteries: LifePO4 Lithium, AGM (Lead Acid), and Flooded Cell (Lead Acid).
Set up a fuse or breaker on wires coming from the solar panels to the cost controller. Do not link solar panels to charge controller till step 9.
Always comply with the producer's directions on order of set up for cost controller. Mount your inverter near the batteries and maintain it away from warmth sources or any other unsafe compounds (destructive). Always comply with the manufacturer's guidelines on order of install for inverter. Connect to batteries. It is suggested that you utilize 120 Thermal Circuit breaker for each battery.
Best Rv Repair Near Me Placentia, CA
Currently the system is 99% done. Before the last step, double-check that all circuitry is right when it comes to polarity (positive and adverse). From the solar panels right to the battery links. Make sure you cover the solar panels to guarantee no electricity is being obtained right into the system.
Take pleasure in the remarkable power of the Sun! Having the ability to have a solar energy system is a video game changer. It opens a flexibility that you would or else not have. When looking at systems ask around and do your study. Batteries play an intricate duty on the length of time you can remain and play in these remote areas.
As soon as the planetary system establishes that your home batteries are sufficiently billed, it will certainly after that guide several of that power to the framework battery. To identify how long your RV's solar panel bank will last, we use a very easy math equation(begin seeing at the 2:06 mark) that entails: recognizing your batteries' amp hours circuitry them in series and parallel converting that last number to watt hours considering that most items that utilize your battery power are gauged in wattage establishing a safe usage range that won't damage your batteries As soon as you've developed this complete watt hours number, separate right into it making use of the wattage amounts from the lights, home appliances, and various other recreational vehicle amenities you'll be utilizing.
These solar panels are made to record sunlight and transform it into useful electric power that can be used to bill batteries, run devices, and supply power for different functions within the recreational vehicle. The power generated by the solar panels can be kept in batteries, enabling motor home owners to have a sustainable and eco-friendly source of power even when they're not connected to traditional electric outlets.
Rv Plumbing Repair Near Me Placentia, CA
There are pure sine wave inverters (ideal for delicate electronic devices) and customized sine wave inverters. Deep cycle batteries keep the power collected by the solar panels. There are various types, including lead-acid, AGM (Absorbing Glass Mat), gel, and lithium-ion, with each having its own advantages and disadvantages. This includes brackets, mounts, and clamps to securely connect solar panels to the RV's roofing system.
From monocrystalline to polycrystalline, thin-film to versatile panels, there's a wide-range of solar power options to match your particular needs. When selecting the excellent photovoltaic panel for your camper, monocrystalline photovoltaic panels stand apart as a prominent and super-efficient option. These panels are crafted from a single crystal structure, making them very reliable in converting sunlight right into useful power.
Motorhome Repair Shop Placentia, CA
: Stiff panels are developed with a solid structure and protective glass cover, making them long lasting and appropriate for fixed installments. They are generally mounted on the flat roofing of a motor home, ensuring stability and ideal power manufacturing. Flexible panels, designed to bend and adapt, are best for curved RV surface areas.
Our group of qualified RV specialists is constantly on standby, pleased to answer any continuing to be questions about solar panels you may have. Buttons Bish's Recreational vehicle Content Manager With over 10 years in the Recreational vehicle sector, Greg integrates firsthand dealership experience with an interest for helping people locate the appropriate Recreational vehicle for their experiences.
(Review why we transitioned from van life to Airstream life right here!) Even with my restricted understanding of solar systems at the time, I recognized it would not amount to a lot. After inspecting it further, the fact was that it had not been actually a system in any way. Most travel trailers just aren't developed for spread outdoor camping off the lot, and Airstreams are no exception.
Camper Ac Repair Near Me Placentia, CA
Encountered with the restrictions of these stock solar systems, a lot of RVers simply make use of gas or diesel-powered generators to keep their batteries rounded off while camping off-grid. We chose early on that we did not desire to travel with a generator. Our key argument was the relentless noise, yet generators have other drawbacks too.
their DIY installment option. As you might expect, the very first choice had to do with a 3rd of the cost of choice two, and the DIY alternative had to do with half the rate for both alternatives. At the time, the idea of installing our very own solar system was a bit frustrating. Regardless of being a rather convenient man, electrical was constantly something that was beyond my proficiency.
Prices can vary considerably depending on the dimension of your wanted system, and what you intend to power. Our 28 Airstream has actually limited "property" on the roof covering for photovoltaic panels, however you can go quite insane with a 45 5th Wheel. After some backward and forward, we decided to go with choice one and the DIY mount alternative.
(Uncertain what any one of this implies?! I wasn't certain in the beginning either, but I can ensure you that AM Solar does. They break this information down way better than I ever could, so take a look at their "Layout Guides" area on their web site for even more information!)Changing to lithium batteries made complex the set up, but due to the fact that lithium batteries can be drawn down substantially further than lead acid batteries, it was absolutely worth the effort.
Rv Service And Repair Near Me Placentia, CA
I obtained ta be straightforward, when I first opened up the box of elements from AM Solar I was bewildered with the thought of, "What the hell have I gotten myself right into?" It took a while, once I outlined every one of the elements and referenced the diagram, I was able to cover my head around just how it all functioned.
They also have a devoted helpline for permanent RVers who needed immediate assistance. Talk concerning consumer service! It didn't take us long to realize that we possibly should have opted for the extra robust system advised by AM Solar. Under excellent sunlight problems, our panels could keep our batteries rounded off, yet a few days of cloud cover or rain and we would locate ourselves needing to plug in.
I will certainly confess, I was a little nervous having their technologies evaluate my job, but they offered me two thumbs up and informed me it was just one of the much better do it yourself mounts they had seen. (SCORE!) It was a good rub on the back, and a great confidence boost introducing what would certainly be another huge RV project.

I had a lot more self-confidence going into this install and I found myself really delighting in the procedure. I didn't also mind piercing that dreadful opening with the roofing system of our Airstream! As of March 2023, we've had this updated system for even more than nine months and are excited by exactly how it has stayed on top of our demands.
Motorhome Generator Repair Near Me Placentia, CA
their do it yourself installment alternative. As you might anticipate, the first option had to do with a 3rd of the cost of option 2, and the DIY option was about half the cost for both options. At the time, the idea of installing our own planetary system was a little bit frustrating. Regardless of being a pretty handy person, electrical was always something that was beyond my expertise.
Maintain in mind that pricing can vary significantly depending upon the dimension of your wanted system, and what you plan to power. Our 28 Airstream has actually restricted "realty" on the roof covering for photovoltaic panels, but you can go pretty insane with a 45 Fifth Wheel. After some to and fro, we made a decision to opt for alternative one and the do it yourself mount choice.
(Not certain what any of this indicates?! I wasn't certain at very first either, however I can ensure you that AM Solar does. Switching to lithium batteries complicated the set up, however since lithium batteries can be drawn down significantly further than lead acid batteries, it was definitely worth the effort.
Rv Plumbing Repair Near Me Placentia, CA
I got ta be honest, when I first opened up the box of components from AM Solar I was overwhelmed with the thought of, "What the heck have I gotten myself into?" It spent some time, but once I laid out all of the elements and referenced the diagram, I was able to wrap my head around just how all of it worked.
They also have a devoted helpline for full time RVers that required prompt help. Discuss customer support! It didn't take us long to realize that we possibly need to have opted for the extra robust system suggested by AM Solar. Under excellent sunlight problems, our panels might maintain our batteries topped off, yet a few days of cloud cover or rain and we would locate ourselves needing to connect in.
I will certainly admit, I was a little nervous having their techs evaluate my work, yet they gave me 2 thumbs up and informed me it was just one of the much better do it yourself installs they had seen. (SCORE!) It was a great rub on the back, and a good self-confidence boost leading into what would be an additional large motor home job.
OCRV Center
Address: 23281 La Palma Ave Yorba Linda, CA 92887Phone: (714) 909-1444
Email: art@ocrvcenter.com
OCRV Center
I had a great deal more confidence entering into this set up and I located myself really enjoying the procedure. I didn't even mind drilling that dreaded hole via the roofing of our Airstream! As of March 2023, we've had this upgraded system for greater than nine months and are excited by just how it has actually stayed on par with our demands.
Rv Repair Service Near Me Placentia, CAMotorhome Awning Repair Placentia, CA
Rv Repair Services Near Me Placentia, CA
Rv Repair Services Near Me Placentia, CA
Rv Mechanics Near Me Placentia, CA
Best Rv Repair Near Me Placentia, CA
Rv Delamination Repair Near Me Placentia, CA
Best Rv Repair Near Me Placentia, CA
Rv Mechanics Near Me Placentia, CA
Rv Repair Centers Near Me Placentia, CA
Rv Solar Panel Installation Placentia, CA
Rv Ceiling Repair Placentia, CA
Motorhome Generator Repair Near Me Placentia, CA
Rv Refrigerator Repair Near Me Placentia, CA
Rv Repair Services Near Me Placentia, CA
Rv Repair Services Near Me Placentia, CA
Motorhome Repair Service Placentia, CA
Rv Service And Repair Near Me Placentia, CA
Rv Delamination Repair Near Me Placentia, CA
Best Rv Repair Near Me Placentia, CA
Rv Repair Shops Near My Location Placentia, CA
Motorhome Repair Shop Placentia, CA
Best Rv Repair Near Me Placentia, CA
Rv Repair In My Area Placentia, CA
Rv Ceiling Repair Placentia, CA
Full Service Rv Repair Near Me Placentia, CA
Rv Delamination Repair Near Me Placentia, CA
Motorhome Refrigerator Repair Placentia, CA
Rv Generator Repair Placentia, CA
Rv Solar Installation Placentia, CA
Rv Repair Shops Near My Location Placentia, CA
Motorhome Repair Service Placentia, CA
Rv Repair Service Near Me Placentia, CA
Rv Solar Installation Placentia, CA
Rv Delamination Repair Near Me Placentia, CA
Full Service Rv Repair Near Me Placentia, CA
Rv Generator Repair Placentia, CA
Motorhome Generator Repair Near Me Placentia, CA
Rv Repair Services Near Me Placentia, CA
Rv Refrigerator Repair Near Me Placentia, CA
Rv Plumbing Repair Near Me Placentia, CA
Motorhome Awning Repair Placentia, CA
Motorhome Repair Service Placentia, CA
Rv Plumbing Repair Near Me Placentia, CA
Rv Repairs Near Me Placentia, CA
Motorhome Refrigerator Repair Placentia, CA
Rv Repair Service Near Me Placentia, CA
Rv Service And Repair Near Me Placentia, CA
Rv Generator Repair Placentia, CA
Rv Service Repair Near Me Placentia, CA
Rv Service And Repair Near Me Placentia, CA
Best Rv Repair Near Me Placentia, CA
Rv Repairs Near Me Placentia, CA
Full Service Rv Repair Near Me Placentia, CA
Rv Repair Service Near Me Placentia, CA
Rv Service Repair Near Me Placentia, CA
Motorhome Repair Near Me Placentia, CA
Rv Delamination Repair Near Me Placentia, CA
Rv Plumbing Repair Near Me Placentia, CA
Rv Repair And Service Near Me Placentia, CA
Rv Delamination Repair Near Me Placentia, CA
Best Rv Repair Near Me Placentia, CA
Motorhome Repair Shop Placentia, CA
Rv Solar Panel Installation Placentia, CA
Rv Repair And Service Near Me Placentia, CA
Rv Service And Repair Near Me Placentia, CA
Best Rv Repair Near Me Placentia, CA
Best Rv Repair Near Me Placentia, CA
Rv Repair Service Near Me Placentia, CA
Motorhome Repair Shops Placentia, CA
Rv Repair Centers Near Me Placentia, CA
Rv Mechanics Near Me Placentia, CA
Rv Service And Repair Near Me Placentia, CA
Rv Generator Repair Placentia, CA
Motorhome Repair Shops Placentia, CA
Rv Refrigerator Repair Near Me Placentia, CA
Motorhome Service And Repair Near Me Placentia, CA
Rv Repair Places Near Me Placentia, CA
Best Seo Near Me Placentia, CA
Find A Seo Marketing Placentia, CA
OCRV Center
Table of Contents
- – Motorhome Refrigerator Repair Placentia, CA
- – OCRV Center
- – Rv Service Repair Near Me Placentia, CA
- – Rv Repairs Near Me Placentia, CA
- – Rv Service Repair Near Me Placentia, CA
- – Best Rv Repair Near Me Placentia, CA
- – Best Rv Repair Near Me Placentia, CA
- – Rv Plumbing Repair Near Me Placentia, CA
- – Motorhome Repair Shop Placentia, CA
- – Camper Ac Repair Near Me Placentia, CA
- – Rv Service And Repair Near Me Placentia, CA
- – Motorhome Generator Repair Near Me Placentia...
- – Rv Plumbing Repair Near Me Placentia, CA
- – OCRV Center
Latest Posts
Ductless Air Conditioner City Of Industry
Sunland Central Air Installation
Beverly Hills Carbon Monoxide Detector Installation
More
Latest Posts
Ductless Air Conditioner City Of Industry
Sunland Central Air Installation
Beverly Hills Carbon Monoxide Detector Installation