All Categories
Featured
Table of Contents
- – Exhaust Fan Installers North Hills, CA
- – Instant Air Solutions
- – Industrial Exhaust Ventilation Systems North H...
- – Garage Exhaust Fan North Hills, CA
- – Garage Fume Extractor North Hills, CA
- – Install Garage Ventilation Fan North Hills, CA
- – Exhaust Fan Installers North Hills, CA
- – Garage Ventilation Installers Near Me North ...
- – Garage Exhaust Vent North Hills, CA
- – Professional Roof Ventilation Services North...
- – Instant Air Solutions
Exhaust Fan Installers North Hills, CA
I have actually had garage ventilation on my mind for a long time currently. In between Eileen and I always doing jobs in the garage, we create a great deal of fumes from paint and staining. Trimming timber in there likewise tosses a great deal of sawdust into the air. Even when I service the lawn mower and other small engines in there, the smell of gasoline remains.
This was not the ideal service. Lots of paint and discoloration jobs would sit in the garage over night loading the air with fumes, just to be aired out when the sunlight showed up and when we can open up the garage doors. Other than the poisonous odors being in the garage the next morning, it would certainly likewise postpone the conclusion of these jobs.
Even more reason to look into garage air flow systems. I put my reasoning cap on and roamed around the garage looking for air flow ideas.
In my previous home, I utilized to run a great deal of computer equipment in the garage that would certainly generate a great deal of warmth. I had researched garage airing vent alternatives at that time and cleared up on a little follower and vent that can be set up straight in the garage door (by means of a small hole that you reduced).
Industrial Exhaust Ventilation Systems North Hills, CA
Throughout the winter months, the garage door vent would certainly let all the chilly air in and drop the garage temperature below the cold factor, damaging my paints and other liquids that were not indicated to be frozen. The garage door vents and exhaust option left a negative taste in my mouth since, and I was identified not to pursue that direction again.
I ultimately picked a way of venting the garage. I would discover an excellent airing vent area in the garage, and reduced a huge square hole in the wall surface (approximately 14"x14" in between the wall surface studs). I would certainly mount self-closing shutter vents on both the interior and exterior of the wall surface.
Garage Exhaust Fan North Hills, CA
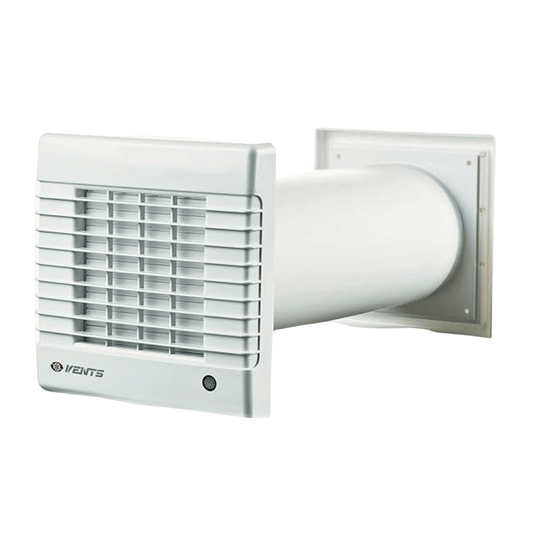
The dual shutter vents were going to be type in aiding to keep the cool air outside during the wintertime. I did a whole lot of research study on exhaust fans and selected one with built-in shutters. I bought a 14" diameter follower efficient in 800 CFM. No wiring was needed with this certain version because it just plugs into an outlet.
For the exterior wall, I went a 14" light weight aluminum shutter air vent (North Hills Garage Exhaust Fan Installation). With the equipment identified, I searched for a suitable location for the air vent. The most effective place would have been above among the garage doors, but also for looks, I really did not desire the vent to be noticeable from the street
It would be almost unseen but still serve its purpose. Here's the location I picked inside for the garage exhaust follower: Here's where the air vent would exhaust outside: Above, you'll see the very first layer I experienced was the drywall. I had 2 layers of insulating foam. Next was the white plastic siding.
The fan would certainly cover all the sides, and hide any type of abnormalities in my cut. This was a required step to stop the fan from venting air into the wall surface.
Garage Fume Extractor North Hills, CA
I couldn't just reduce a hole in the exterior siding, place the air vent, and stop. To maintain water from passing through the exterior siding, I required to utilize J channel. This would allow me to create a framework around the vent that would overlap the house siding and shield the rough-cut sides from water.
I adhered to some fantastic directions on (under the section "Mount J-channel around the home window"). Here's an image showing the put together J network items twisting around the vent: Currently came the fun task of working with the siding. To appropriately mount the exterior air vent, I required access to the wall surface below the siding, which indicated eliminating numerous items of siding.
, I was able to conveniently remove some siding, and draw it away from the wall. With enough of the house siding out of the method, I was able to proceed job on the hole.
Install Garage Ventilation Fan North Hills, CA
Next, I put the shutter air vent and nailed it in the wall surface studs. Below's a picture showing some progression: With the garage air vent in area, I attached the J channel structure, overlapping the rough cut edges of the plastic exterior siding.
I inserted the exhaust follower in the hole and was getting prepared to screw it right into the studs. I made a decision to check the vents on the fan to make certain they opened up and closed properly.
After some fiddling, I found that the opening I cut was too snug of a fit for the follower structure. It was distorting the structure ever before so slightly to cause the shutters to not close effectively. If I drew the fan regarding 2 inches out from the wall, the shutters functioned penalty.
I would certainly constructed a 24 wood structure in between the wall surface and the follower, to give the exhaust fan sufficient distance from the hole for the shutters to operate appropriately. I literally invested just 10 mins on this task I cut some 2x4s to length with the miter saw. I connected them to each various other with pocket opening screws to create a framework.
Exhaust Fan Installers North Hills, CA
Below's a photo of the garage wall surface exhaust fan frame (the pocket holes are hidden on the various other side): At last, the exhaust fan could be bolted to the wall surface. I pressed the follower against the 24 structure and made certain the shutters opened and closed openly. I connected the fan to the 2x4s with some durable screws.
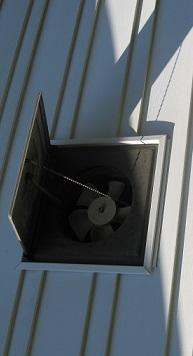
I stood back, appreciated my handiwork and after that terminated up the exhaust fan with my cordless switch. As the follower rate boosted to full, both the within and outdoors shutters open up to tire the garage. The follower was not that loud either (it was barely audible outside the garage). Here's a photo of the mounted garage wall exhaust fan (powered on) from the within: Here's a photo of the exterior of the garage wall surface exhaust follower, revealing the vents open with the fan on: I'm extremely delighted concerning our new garage exhaust follower.
We had a mild snow shower (concerning 4 inches), and so I broke out the snowblower to attempt it out. As forecasted, when I finished removing the snow from the driveway and put away the snowblower in the garage, the still-warm engine began to have an odor up the garage. I engaged the brand-new exhaust fan for a couple of hours, and the garage was back to normal.
The total expense of putting the vent fan in the garage was around $150 and was collectively regarding a day's well worth of job. If you require exhaust followers in the garage, this tutorial will have your new garage wall surface exhaust follower up and running quickly! I was really pleased with the garage air vent follower.
Garage Ventilation Installers Near Me North Hills, CA
I did add one even more point to our garage air vent fan. I had actually been by hand transforming the fan on and off as needed. Sometimes I left it running longer than I anticipated. I desired a far better system of transforming the fan off. I ended up buying an digital timer switch and connected the fan into it.
Of course you desire to make sure that the method the follower is transformed on is practical to you. Currently is the time to choose.
It may deserve it to run a duct just to compel the air to stream throughout. If you desire to get fancy, you might incorporate some degreee of filtering system also. This is outside the range of your concern yet I always such as to make sure a workspace is well lighted with a lot of lumens and as little glow as possible.
An exhaust follower's capability is the amount of air it can relocate, which is measured in cubic feet per minute (CFM).
Garage Exhaust Vent North Hills, CA
Are you thinking of a DIY garage exhaust follower installment yet unsure if it's actually needed? Allow's damage down the benefits and help you make a decision if it's the right relocation for you. A great garage exhaust fan can do a lot more than maintain points awesome. Right here are a few of the key advantages: Exhaust fans remove contaminants, fumes, and odors that can accumulate in your garage.
You may require to increase the ability if you run a store that generates lots of fumes or dust. You've got a few options when it involves the kind of follower: These prevail and fairly very easy to install. They take place your garage wall and eliminate the air through the outside wall.
Professional Roof Ventilation Services North Hills, CA
Currently for the enjoyable partinstalling the follower! It's not rocket scientific research however requires some standard do it yourself abilities. Below's a basic overview of the process: Before starting, ensure you have the right tools and products. You'll need points like: Shatterproof glass and handwear covers The exhaust fan itself A measuring tape Wire ports Wire cutters Screwdrivers A pencil Screws Jigsaw A pierce Safety and security initially, folks! Before you start messing with power, shut off the power to the circuit you'll be working with.
Do you want it on the wall surface or the garage ceiling? If you're putting it on the wall, ensure it's high sufficient that you will not bump your head on it. If you're placing it on the ceiling, guarantee it remains in a spot where it will certainly supply good air movement. Once you have actually picked your spot, you should reduce an opening in the wall or ceiling.
Now, it's time to link the follower to the electric wiring. The adhering to photo shows an instance electrical wiring representation for an exhaust fan and light controlled by a button and timer.

Instant Air Solutions
Address: 412 W Dryden St Apt 6 Glendale, CA 91202Phone: (747) 307-6363
Email: instantairsolutionsinc@gmail.com
Instant Air Solutions
After setting up the fan, seal any kind of voids around the housing with caulk or weatherstripping. Doing so prevents air leaks and shuts out insects, guaranteeing your fan operates efficiently. Next, transform the power back on and test the follower. Check fan rate and ensure air spurts of your garage, not in.
Industrial Exhaust Fan Installation Near Me North Hills, CAExhaust Fan Installer North Hills, CA
Garage Wall Exhaust Fan North Hills, CA
Garage Exhaust System North Hills, CA
Exhaust Fan Installer North Hills, CA
Near Seo Services For Business North Hills, CA
Local Top Seo Company North Hills, CA
Garage Exhaust Fan Installation North Hills, CA
Instant Air Solutions
Table of Contents
- – Exhaust Fan Installers North Hills, CA
- – Instant Air Solutions
- – Industrial Exhaust Ventilation Systems North H...
- – Garage Exhaust Fan North Hills, CA
- – Garage Fume Extractor North Hills, CA
- – Install Garage Ventilation Fan North Hills, CA
- – Exhaust Fan Installers North Hills, CA
- – Garage Ventilation Installers Near Me North ...
- – Garage Exhaust Vent North Hills, CA
- – Professional Roof Ventilation Services North...
- – Instant Air Solutions
Latest Posts
Beach Senior Pictures Anaheim Hills
Senior Residential Care Idyllwild
Senior Home Services Indio
More
Latest Posts
Beach Senior Pictures Anaheim Hills
Senior Residential Care Idyllwild
Senior Home Services Indio